Hi everyone!! I know it's been a while since I have made any posts. Things are changing in a big way for our family very soon and we have been focusing on making things happen. I just wanted to give you an update and say Thank You for reading the blog and hopefully getting some good ideas to play with your kiddos!
I also wanted to let you know that, when I do get back to the blog on a regular basis, I am gonna have to restructure it a bit. It seems I have hit the limit on photos allowed. I will be going through old posts and slimming them down a bit, so that I have room to work with in future posts. But don't worry. There is no limit on the number of photos I can post on my FB page! I will always add any additional pics of activities and play over there! Thanks again for sticking it out and please be patient during this transition. :)

Wednesday, May 30, 2012
Friday, April 6, 2012
Glow Egg Hunt
It's the Friday before Easter, so time to kick off the Holiday events! We decorated Easter eggs in the morning and after bath time this evening Daddy and I put together this glow in the dark Easter egg hunt for Caitlyn! We used plastic Easter eggs and some glow stick bracelets. I highly recommend using the smallest glow sticks you can find, some finger lasers, or small lights, because it was rather difficult fitting these in the eggs. I also added a small candy in each egg :)


She was so proud she found them all!
Happy Easter everyone!
Tuesday, April 3, 2012
Popsicle Stick Puzzles
I wanted to make my oldest daughter some Popsicle stick puzzles that she would enjoy playing with, so I found some images online of some of her favorite things and printed them out. Here is what you need to turn your little ones favorite images into puzzles, too!

What You Need:
Print-outs of pictures
Popsicle sticks (larger ones work best)
A Laminator (although not necessary, still a good idea)
Lamination sheets
Glue
Blade Cutter and/or Scissors
I started off buy cutting out the images I printed up (using 4x6 pic size on my printer) and then cutting them into strips about the same width as the Popsicle sticks.

I laid them in the lamination sheets, making sure the pieces were not touching each other.

I try to fit as many as I can on each sheet, I hate wasting space. I'm weird like that :P
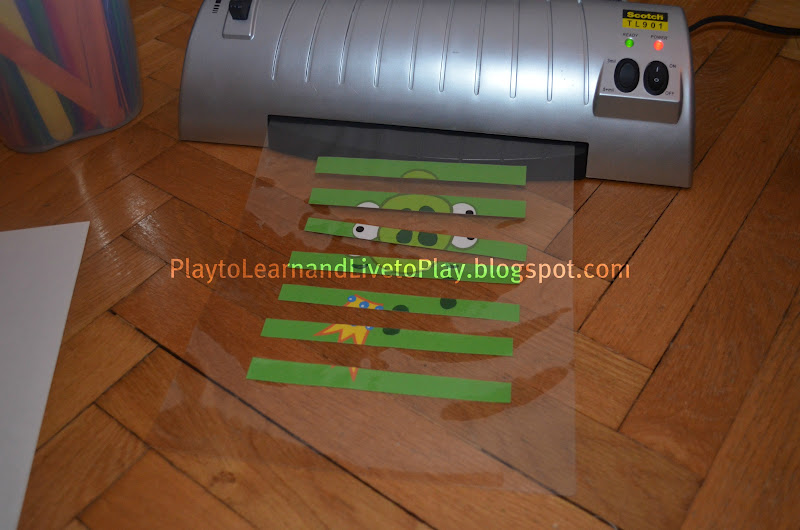
Then I ran the sheets through the laminator.
You can skip laminating the images if you don't have a laminator and that is fine. I just wanted them to be more durable.

After they were laminated, I cut each piece out using my blade cutter. You can use scissors too, but I get a much cleaner cut with this nifty little device!

Use a little (the picture above has way too much!) glue to adhere the strips to the sticks.

Let 'em dry and there you have it!

I was very happy with the way these turned out! But there is still another way you can use them!

If you get some magnetic adhesive sheets, you can add some strips of that to the back of the Popsicle sticks and make them Magnetic Puzzles!

Mario is now on my fridge! :D

Enjoy! And happy Playing!
Saturday, March 24, 2012
Puffy Paint
This is the Puffy Paint invitation I set up for Caitlyn. If you don't know what Puffy Paint is, I first saw it here. It is a paint made with flour and other food ingredients. (I have a post with the recipe and instructions here.) And when you are done painting with it, you pop your painting into the microwave for about 30 seconds, or until dry. The paint stays fluffy! It's a really fun rainy day activity.

I set out some pieces of poster board (you can also use cardboard, but make sure you use something stiff. You'll need to carry it to the microwave before it is dry), some brushes, some foam stamps, and a few cotton balls.
Recipe: Puffy Paint
This is Puffy Paint. You paint with it, then nuke your painting in the microwave for about 30 seconds (or until dry), and it puffs up! Pretty cool!
I wrote a whole other post about the paintings my daughter did here. So this is just the recipe for you.
Here is what you will need:

1 Tablespoon of Self-rising Flour
1 Tablespoon of salt
Food Coloring
Water
OR
1/2 cup of Flour + 2 Teaspoons of Baking Soda
2 Teaspoons of salt
Food Coloring
Water
Bowls to separate each color in.
I didn't have self-rising flour, so I used the flour and baking soda combo. I have a feeling that the self-rising flour is a better option though. It may fluff up more, we will have to try it out next time!

Mix out the dry ingredients.
Then separate the mixture evenly into as many bowls as different colors you want to make.
Add a few drops of food coloring to each bowl.
Then slowly add a little water to each until they are a smooth paste.

Glob it onto the poster board or cardboard for best results. The thicker the paint, the bigger the fluff! Just try to avoid HUGE globs, or it may not dry evenly.
Enjoy!
Subscribe to:
Posts (Atom)